
How to Change or Replace a Tap Washer
Table of content
If your tap is constantly dripping and the water flow does not stop completely when it is closed, then the washer is likely to be damaged and will need to be replaced. In our guide, you can easily learn how to change a tap washer. However, before you get started, you will need some tools. Make sure you have a slot-head screwdriver, two adjustable pipe wrenches, a pack of washers and some cloths.
Common Signs of Worn-Out Washers
Detecting a worn-out washer is relatively straightforward if you know what signs to look for. The most obvious indication is a dripping tap, which can be both annoying and wasteful. Even a minor drip can lead to significant water wastage over time, impacting your water bill and the environment. If you notice your tap leaking even when fully turned off, it’s a clear sign that the washer needs replacement.
Another sign of a worn-out washer is difficulty in turning the tap on or off. If you find that you need to apply extra force to operate the tap, it could mean that the washer is not forming a proper seal. This may also result in the tap making unusual noises, such as squeaking or grinding, when in use. These symptoms indicate that the washer has lost its flexibility and can no longer function effectively.
In some cases, you might observe water pooling around the base of the tap or see water stains on the sink or countertop. This could be a sign that the washer has degraded to the point where it can no longer contain the water flow. Ignoring these signs can lead to more severe issues, including damage to the tap itself or even water damage to your property. Therefore, it’s essential to address the issue promptly by replacing the worn-out washer.
There are some rules and regulations when it comes to doing this, therefore be sure to check the government website to make sure you can legally DIY and replace your washers. Most of the time, this is a simple task, but it depends on the existing tap. Your tap’s hardware may be old and completely seized up, so you might be required to call an emergency plumber.
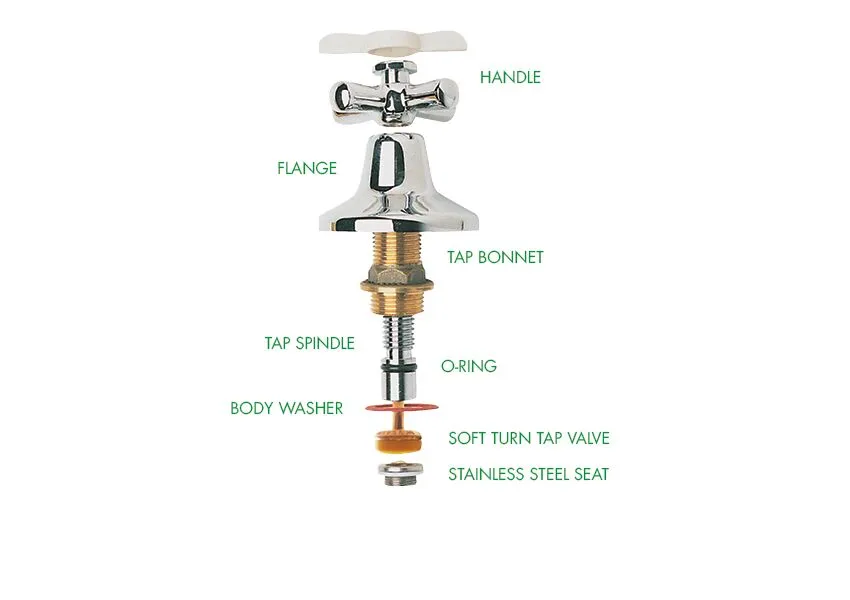
Before you start, you should check the tap hardware. Taps come in all sizes and shapes, but most of them have a washer, a body washer and an O-ring. These are the items that need to be replaced, so go to your local plumbing shop. It is always good to apply grease to the thread, so it is smooth when turned on and off.
Tools and Materials Required for the Replacement
Replacing a tap washer is a straightforward task that requires only a few essential tools and materials. First and foremost, you will need a set of adjustable spanners or wrenches to loosen and tighten the various components of the tap. A screwdriver set will also be necessary, as many taps have screws that need to be removed to access the washer.
You’ll also need a pair of pliers, which can be useful for gripping and turning stubborn parts that might be difficult to handle with a spanner or wrench. Additionally, keep a cloth or rag handy to wipe away any water that might spill during the process. You might also want to have a small container or tray to keep all the screws and small parts in one place, preventing them from getting lost.
For the replacement washer itself, make sure you have the correct type and size. It’s often a good idea to bring the old washer to a hardware store to ensure you get an exact match. Some other useful items include plumber’s tape, also known as Teflon tape, which can help create a watertight seal around the tap threads, and a lubricant suitable for plumbing applications to ensure smooth operation.
Safety Precautions Before Starting the Replacement
Before you begin replacing the tap washer, it’s crucial to take some safety precautions to ensure a smooth and accident-free process. The first and most important step is to turn off the water supply to the tap you will be working on. This is usually done by turning the isolation valve, which is typically located under the sink. If you can’t find an isolation valve, you may need to turn off the main water supply to your home.
After turning off the water supply, open the tap to drain any remaining water in the pipes. This will minimize the risk of water spilling out when you disassemble the tap. It’s also a good idea to place a cloth or towel in the sink to catch any small parts that might fall during the process. This will prevent them from going down the drain and getting lost.
Ensure you have adequate lighting in your workspace so you can clearly see what you’re doing. If you’re working under a sink or in a dimly lit area, consider using a portable work light or a headlamp. Wearing protective gloves can also be beneficial, as they provide a better grip on tools and protect your hands from sharp edges or hot water. Taking these precautions will help you carry out the replacement safely and efficiently.
Step 1: Turn off the water at your main water meter
Make sure the water is isolated by opening the hot and cold taps. When the water loses its pressure and finally stops, then you have achieved isolation. This may take a few minutes.
Step 2: Remove your tap
Each tap is unique in how it should be removed. The trick is to be patient and find the part that needs to be undone first.
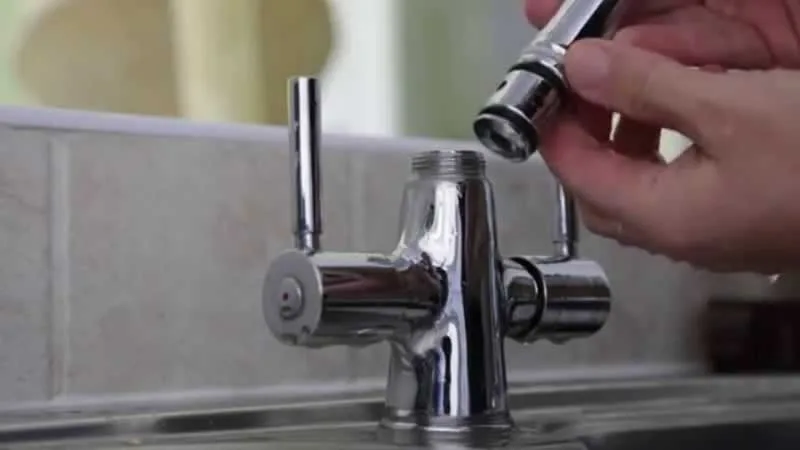
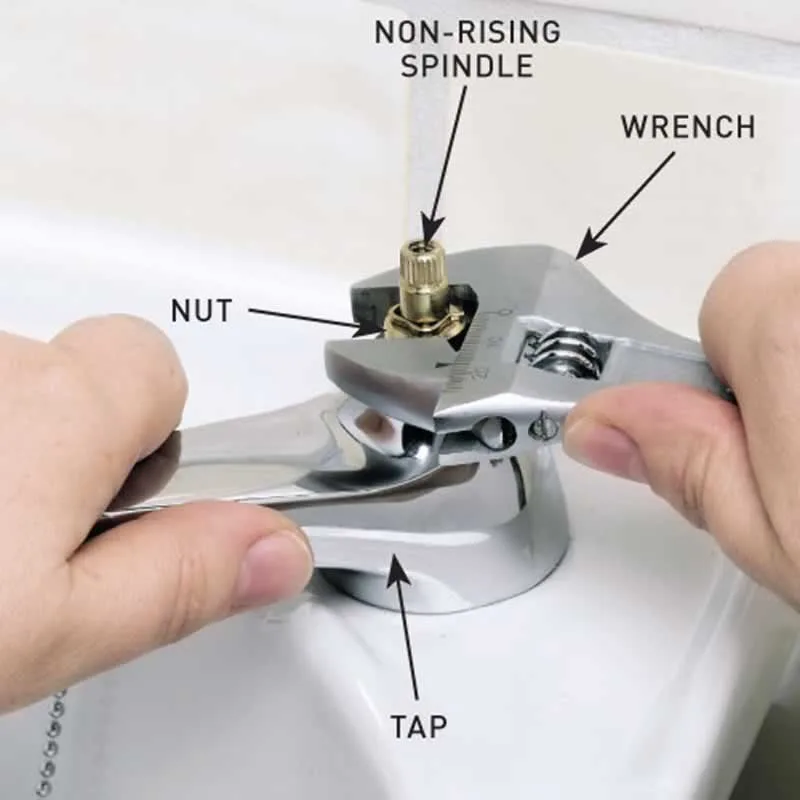
Now that you’re prepared, it’s time to remove the old washer from your tap. Follow these steps to ensure a smooth and successful process. First, use your adjustable spanner or wrench to remove the tap handle. This is usually secured with a screw, which may be concealed under a decorative cap. Use a flathead screwdriver to gently pry off the cap and then unscrew the handle.
Once the handle is removed, you’ll need to take off the tap bonnet, which is the part that covers the valve mechanism. Use your spanner to unscrew the bonnet, taking care not to damage the surrounding area. With the bonnet removed, you should see the valve mechanism, which houses the washer. Use your pliers to unscrew the valve mechanism from the tap body.
With the valve mechanism removed, you can access the washer. The washer is typically held in place by a small screw. Use a screwdriver to remove this screw and then take out the old washer. Inspect the valve seat for any signs of damage or debris. If the valve seat is damaged, you may need to replace it or use a valve seat grinder to smooth it out. Clean the area thoroughly before proceeding to the next step.
Step 3: Replace the washer
With the old washer removed and the correct replacement in hand, it’s time to install the new washer. Begin by placing the new washer into the valve mechanism where the old washer was located. Ensure it sits flat and snugly in place. Secure the washer with the small screw, making sure it is tightened firmly but not overly tight to avoid damaging the washer.
Step 4: Now assemble the tapware
Now assemble the tapware. To do this, we reverse the second step and assemble each part of the tap. If you are stuck and do not remember the order, do not worry-look for online tutorials to help you along the way and you should be right. Once all the tapware has been replaced, the last step is to open the water and check that it functions well. Then turn off the water and see if the tap is leaking. Note that some air may come out of the tap because you have drained it, therefore allow the taps to run for a few minutes until the water flows freely.
Testing for Leaks After Replacement
After installing the new washer, it’s essential to test the tap for any leaks to ensure the replacement was successful. Start by fully opening and closing the tap several times to check for smooth operation. Pay close attention to the area around the tap handle and base, as these are common spots for leaks to occur.
If you notice any drips or water pooling around the base of the tap, it could indicate that the washer is not seated correctly or that the tap components are not tightened properly. In this case, you may need to disassemble the tap and check the washer’s position and the tightness of the components. Sometimes, a small adjustment is all that is needed to achieve a watertight seal.
It’s also a good idea to check for leaks over the next few days, as some issues may not be immediately apparent. Keep an eye on the tap and listen for any unusual noises or drips. If you notice any problems, address them promptly to prevent further water wastage and potential damage. With a properly installed washer, your tap should function smoothly and remain leak-free.
Conclusion: Enjoying a Leak-Free Tap
Replacing a tap washer might seem like a daunting task, but with the right tools, knowledge, and a bit of patience, it can be a straightforward and rewarding process. Addressing a dripping tap not only saves water and reduces your utility bills but also prevents potential damage to your home. By following our step-by-step guide, you can tackle this common household issue with confidence.
Understanding the role of tap washers, recognizing the signs of wear, and knowing how to choose the right replacement are all crucial steps in maintaining a leak-free tap. Regular maintenance and proper care can further extend the life of your washers and keep your taps in optimal condition. With a little effort and attention, you can enjoy the benefits of a smoothly functioning tap without the annoyance of drips and leaks.
So, the next time you hear that telltale drip, remember that a simple washer replacement can make all the difference. By taking the time to fix your tap, you’re ensuring a more comfortable and efficient home environment. Don’t let a dripping tap drive you crazy – follow our guide and enjoy the peace of mind that comes with a leak-free tap. Happy fixing!
About the author – John Barnes
 Handyman tips website was created by John Barnes from Phoenix, Arizona, in February 2014. John wanted to share with the public his 20 year experience in home improvement as a contractor and avid woodworker. John noticed that there aren’t many expert advice online and he wanted to help the public to get true expert tips and estimates. What started as a hobby soon became a full time job as Handyman tips website became very popular because of the quality of tips it provides. After a few years John has introduces a couple of new content creators into Handyman tips team but he is still the main content creator on Handyman tips website.