
The Ultimate Guide to Building Your Own DIY Dog House
Table of content
Are you looking to create the perfect sanctuary for your four-legged friend? Look no further! In this comprehensive guide, we will take you through the step-by-step process of building your own DIY dog house. From design inspiration to choosing the right materials, we have got you covered.
Creating a cozy and comfortable retreat for your furry companion is not only a labor of love but also a practical way to ensure their well-being. Imagine the joy on their faces when they have their very own space to relax and unwind.
Whether you are a seasoned DIY enthusiast or a novice, our guide is designed to cater to every skill level. We will provide you with expert tips, tricks, and detailed instructions to help you craft a dog house that meets both your dog’s needs and your personal style.
So, let’s get started on this exciting journey of building a custom dog house that will provide your beloved pet with a safe and snug haven they will love for years to come.

Why build a DIY dog house
Building a DIY dog house offers numerous benefits for both you and your furry friend. Firstly, it allows you to customize the design and size according to your dog’s specific needs. This ensures that the dog house provides optimal comfort and security. Additionally, building your own dog house can be a cost-effective alternative to purchasing a pre-made one. It allows you to save money while also having the satisfaction of creating something with your own hands.
Furthermore, building a DIY dog house can be a fun and rewarding project for the entire family. It provides an opportunity to bond, learn new skills, and unleash your creativity. By involving your children or other family members in the process, you can teach them about responsibility and the importance of taking care of animals.
Choosing the right location for your dog house
Before starting the construction of your DIY dog house, it is essential to choose the right location. Consider placing the dog house in an area that provides shade and protection from the elements. Avoid areas with excessive moisture or direct sunlight, as these can negatively impact your dog’s comfort.
Additionally, it is crucial to select a location that is easily accessible for your dog. Ideally, the dog house should have a clear pathway leading to it, allowing your furry friend to enter and exit without any obstacles. Take into account factors such as the prevailing wind direction to ensure your dog is sheltered from strong gusts.
Lastly, consider the surroundings of the dog house. If your dog enjoys spending time outdoors, ensure there is enough space for them to roam and play in a safe and secure environment.
Determining the size and design of your dog house
The size of your dog house should be determined by your dog’s breed and size. It is essential to provide enough space for your dog to move around comfortably and stretch out. Measure your dog’s length, height, and width to determine the appropriate dimensions for the dog house.
When it comes to design, there are countless options to choose from. You can opt for a classic pitched roof design, a modern flat-roofed design, or even get creative with a unique shape or theme. Consider your dog’s personality and your personal style when selecting the design. Remember, the goal is to create a space that reflects your dog’s individuality and provides them with a cozy retreat.
First take a look at the dog house plan in the picture below. The dimensions are metric and the dog house is intended for dog under 60 cm of height. If you have a bigger dog then you need to scale all the dimensions to suit your pet needs.

Materials needed for building a dog house
To ensure the durability and longevity of your DIY dog house, it is crucial to choose the right materials. The primary material for the structure should be weather-resistant and able to withstand the elements. Popular options include wood, plastic, and metal. Wood is a classic choice that provides excellent insulation, while plastic and metal offer durability and ease of maintenance.
For the roofing material, consider using asphalt shingles or metal sheets. These materials provide effective protection against rain and other weather conditions. Additionally, ensure that all screws, nails, and other fasteners used are rust-resistant to prevent deterioration over time.
It is also important to use non-toxic materials for the interior of the dog house. Opt for pet-safe paints and finishes to protect your dog from any harmful chemicals. Providing a comfortable bedding material such as straw or foam will also ensure your dog’s comfort.
Step-by-step guide for building a DIY dog house
Now that you have determined the location, size, design, and materials for your dog house, it’s time to start the construction process. Follow these step-by-step instructions to build your very own DIY dog house:
- Prepare the foundation: Start by leveling the ground and creating a solid foundation for the dog house. This can be done by using concrete blocks, paving stones, or a wooden base.
- Build the frame: Using the selected materials, construct the frame of the dog house according to the predetermined dimensions. Ensure that the frame is sturdy and securely fastened.
- Install the walls: Attach the walls to the frame, leaving space for the entrance and any windows or ventilation openings. Use appropriate insulation material between the walls for added comfort.
- Add the roof: Install the roofing material of your choice, ensuring it is securely fastened and provides adequate protection from the elements. Consider adding an overhang to provide additional shade.
- Create the entrance: Cut out the entrance according to the size of your dog, taking into account their height and width. Smooth any rough edges to prevent injuries.
- Finish the interior: Add a layer of insulation to the interior walls for temperature control. Install a comfortable bedding material and any additional features such as hooks for hanging toys or a water bowl.
- Paint and seal: Apply pet-safe paint or stain to the exterior of the dog house, ensuring it complements your outdoor space. Seal any gaps or cracks to enhance weatherproofing.
- Personalize the dog house: Add finishing touches such as a nameplate, decorative trim, or a personalized sign to make the dog house truly unique.
- Test and adjust: Before introducing your dog to their new home, thoroughly inspect the dog house for any potential hazards or discomfort. Make any necessary adjustments to ensure it is safe and comfortable.
For the whole project of making this DIY dog house we will use 8mm thick plywood. The dimensions of the floor are 97×75 cm so you will need two boards for the floor and you will also need 2×2 cm planks for the frames. For the isolation we will use 2cm thick styrofoam. Now assemble the frame and insert styrofoam boards in the frame like in the picture below.  Then close the frame on the other side with plywood like in the picture below.
  Next, you need to attach the planks with wood glue and then secure it with 3/4 inch wood screws when you put the upper board on like in the picture below. Make sure that you first drill the holes 1 size smaller than the screw because otherwise the planks may crack. The side panels are built the same way as the floor panel but the dimensions are 97×50 cm. Don’t use the glue for the side panels and secure it with screws right away. Also don’t put the styrofoam and cover panel just now, leave it for the finish. After the both sides are finished, attach them to the floor with wood screws as in the picture below.
 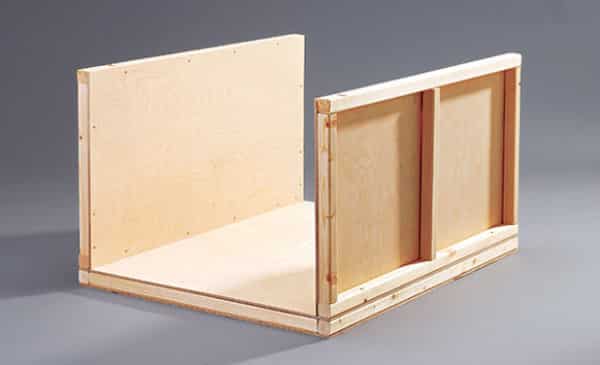 Now we are finished with the easy part of the project and it is time for the front and back side of the dog house. Use the jig saw to cut the front and back panels and take notice that they are at 40 degrees angle on the top. Always first draw the shape on the sheet of plywood and then secure the sheet with the clamp and only then you can start with the cutting. After that you will need to cut the entrance door on the front panel and the dimensions of the entrance are 40×25 cm. The arch shouldn’t be a problem, just carefully draw it and slowly cut it with the jig saw at the lowest speed. When the cutting is completed, frame the front and back side with 2×2 cm planks like the floor and side panels but leave planks on the slope 15 cm longer as in the picture below. After the framing is complete join the front and back side with four 2×2 cm planks 93 cm long.
  Use the corner braces to join the planks with the front and back side. Lower roof planks must be 2 cm off the frame on both sides because the side panels wouldn’t fit otherwise. Cut small four pieces of plywood like in the picture below and attach the plank with corner brace and wood screws.
  Then it is time to attach the roof panels. Turn the house on the side like in the picture below and secure the panel with clamps. Drill the holes and attach the panels with wood screws.
  Now it is time to put together this part with the base which we made in the beginning. Attach it with wood screws on both sides and to the floor on the front and back side. Now fill the spaces between the planks with styrofoam for isolation like in the picture below.
  The final thing is to put wood strip flooring on the outer side of the dog house. Cut the wood strip on the needed size and then attach it with 1 inch nails only on the outer planks of the dog house.
  After you finished with attaching the wood strip it is time to secure the roof from leaking with bitumen strip or shingle. After that all you have to do is to paint the dog house with your favorite color but make sure that you put at least two coats of paint because you must protect the wood against the elements. This DIY dog house is best mounted on stone blocks or bricks at least 5 cm thick and never put the house directly on the ground.
Tips for insulating and weatherproofing your dog house
Insulating and weatherproofing your DIY dog house is crucial for ensuring your dog’s comfort and safety in all seasons. Follow these tips to effectively insulate and weatherproof your dog house:
- Insulation: Use insulation materials such as foam panels or polystyrene sheets to line the interior walls of the dog house. This will help regulate temperature and provide additional warmth during colder months.
- Weatherproofing: Apply a waterproof sealant to the exterior of the dog house to protect it from moisture and prevent rotting or warping. Ensure that all joints, seams, and gaps are properly sealed to prevent drafts.
- Ventilation: Install vents or windows with adjustable covers to allow for proper air circulation. This will prevent the dog house from becoming too stuffy during warmer months.
- Elevated flooring: Raise the flooring of the dog house slightly above the ground to prevent moisture buildup and improve insulation. This can be achieved by using concrete blocks or wooden slats.
- Door flaps: Consider installing a door flap to keep out drafts and retain heat during colder months. Ensure that the flap is easy for your dog to navigate and does not hinder their movement.
Adding comfort and personalization to your dog house
To truly make your DIY dog house a cozy retreat, consider adding some personal touches and comfort features. Here are some ideas to enhance your dog’s experience:
- Soft bedding: Provide your dog with a comfortable and washable bedding material such as foam or blankets. This will create a cozy and inviting space for them to relax.
- Elevated platform: Install an elevated platform inside the dog house to keep your dog off the cold floor. This will provide additional insulation and prevent the bedding from getting dirty.
- Toys and chew treats: Keep your dog entertained by adding a few of their favorite toys or chew treats to the dog house. This will provide mental stimulation and help prevent boredom.
- Personalized nameplate: Add a nameplate or sign to the exterior of the dog house, featuring your dog’s name or a fun message. This will give the dog house a personalized touch and make it feel like their own special space.
- Shade and water: Consider adding a shade sail or awning outside the dog house to provide additional shade and protection from the sun. Place a water bowl nearby to ensure your dog stays hydrated.
Dog house maintenance and cleaning tips
Regular maintenance and cleaning are essential to ensure the longevity and hygiene of your DIY dog house. Follow these tips to keep it in top condition:
- Regular inspections: Thoroughly inspect the dog house at least once a month for any signs of damage, wear, or pests. Make any necessary repairs promptly to prevent further deterioration.
- Cleaning: Remove any debris, dirt, or pet hair from the interior of the dog house regularly. Use pet-safe cleaning products to disinfect and freshen up the space.
- Bedding maintenance: Wash the bedding material regularly to keep it clean and odor-free. Follow the manufacturer’s instructions for washing and drying.
- Pest prevention: Take steps to prevent pests such as fleas, ticks, and insects from infesting the dog house. Use pet-safe pest control products and regularly treat your dog for fleas and ticks.
- Seasonal maintenance: Inspect the dog house before each season to ensure it is still weatherproof and adequately insulated. Make any necessary adjustments or repairs to prepare it for the changing weather conditions.
Safety considerations for your DIY dog house
While building a DIY dog house can be an enjoyable project, it is important to prioritize safety for your furry friend. Here are some safety considerations to keep in mind:
- Non-toxic materials: Ensure that all materials used in the construction of the dog house are non-toxic and safe for your dog. Avoid using treated wood or harmful chemicals that could be harmful if ingested.
- Smooth edges: Be mindful of sharp edges or rough surfaces that could cause injuries to your dog. Sand down any rough edges or surfaces to make them smooth and safe.
- Secure fastenings: Double-check that all screws, nails, and other fasteners are securely fastened to prevent any parts from coming loose or posing a hazard to your dog.
- Proper ventilation: Ensure that the dog house has proper ventilation to prevent the buildup of stale air or excessive heat. This will help maintain a comfortable and healthy environment for your dog.
- Regular inspections: Regularly inspect the dog house for any signs of damage, wear, or hazards. Address any issues immediately to prevent accidents or injuries.

Conclusion: Enjoying the benefits of a homemade dog house
Building your own DIY dog house is a rewarding and fulfilling project that provides numerous benefits for both you and your furry friend. By following this ultimate guide, you have learned how to choose the right location, determine the size and design, select suitable materials, and construct a dog house that meets your dog’s needs.
Remember to prioritize your dog’s comfort and safety throughout the entire process. Insulate and weatherproof the dog house, add personalized touches, and regularly maintain and clean it to ensure your dog has a cozy and inviting retreat.
Now, it’s time to sit back, relax, and watch your beloved pet enjoy their new home. The joy and happiness they experience in their custom-built dog house will be a testament to your love and dedication as a pet owner. Happy building!
We hope that this article inspired you to built your own dog house and if it did send as pictures of it and we will publish it on our site. There should be plenty of room to fit a dog bed into it. Now, grab your toolbox and start building!
About the author – John Barnes
 Handyman tips website was created by John Barnes from Phoenix, Arizona, in February 2014. John wanted to share with the public his 20 year experience in home improvement as a contractor and avid woodworker. John noticed that there aren’t many expert advice online and he wanted to help the public to get true expert tips and estimates. What started as a hobby soon became a full time job as Handyman tips website became very popular because of the quality of tips it provides. After a few years John has introduces a couple of new content creators into Handyman tips team but he is still the main content creator on Handyman tips website.
amazing work
making a house for a dog with your own hands is more interesting than buying. I will definitely use your tips. Thank you
Hi,
styrofoam acts as an insulator from cold and heat with the same efficiency!
Regards,
The Handyman tips team!
Great job.
One question:
Will the styrofoam insulate it from cold and also heat?