
How to fix an edge or corner of a wall
Table of content
The house and its walls are continually exposed to various blows and deteriorations caused by daily use. One of the areas that tend to be damaged more easily, precisely because of that step effect and one are the edges of the walls. Edges are the most vulnerable and can get damaged easily. This can be prevented by taking precautionary measures. Most of the house use stainless steel corner guards to protect walls corners and edges from damage. This is the safest and cheap way of protecting corners and edges.
Perhaps by moving a piece of furniture in a room or by the continuous passage, it is easy for the edges of the walls to flake, causing, in most cases, unsightly and ugly images for the whole house, with simple arrangements, will be renewed and as if it had just premiered.
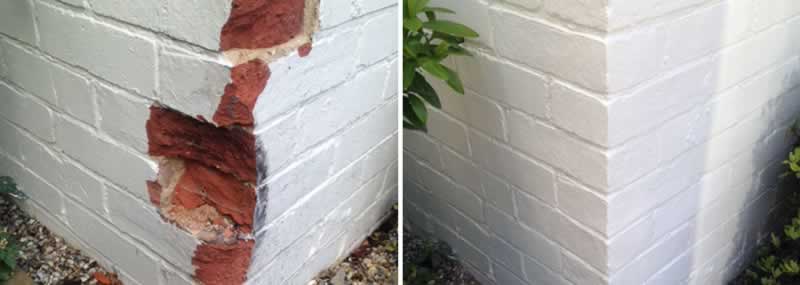
Reconstruction of an edge or corner of a wall
Keeping a house in good condition amid the chaos of daily life can be a challenge. Even the most careful family occasionally have accidents where the walls lose due to chipping and sinking in the plaster. The corners and the edges seem to have the most damage and it is just in these places where even the smallest dent turns out to be especially noticeable.
Fortunately, it is not difficult to repair the plaster chips, nor fill the holes in the wall. A good handyman can always make an arrangement of the wall, a reconstruction of the corner that has been detached. You will have your wall as new in a matter of minutes.
Steps to follow to fix an edge or corner of a wall
- Enlarge the affected surface by scratching part of the plaster until it reaches the bottom of the wall.
- Nail a wooden strip along the edge of one of the sides to mark the edge line in this way.
- Prepare a cement mortar and fill the hole, covering everything from the edges to the strip.
- Smooth the remaining cement and remove with a wooden plank.
- Once a couple of days has passed since the last operation, when the cement has already set, remove the strip and proceed to nail on the opposite edge performing the same operation as described above, but on the opposite side.
- Cover the hole on that other side with cement until it reaches the wooden strip, and make a first smoothing of the area with a pallet.
- Carefully smooth the cement of the set, without tightening too much with the help of a trowel.
- When the cement is almost hard, wet coarse-grained sandpaper and proceed to sand the treated surface.
- Once the area is completely dry and sanded, without protuberances or imperfections, paint so that the intervention is not noticed. If the paint is old, you may have to paint a very large area and even the entire room, so you do not notice the change in color of the paint.
About the author – John Barnes
 Handyman tips website was created by John Barnes from Phoenix, Arizona, in February 2014. John wanted to share with the public his 20 year experience in home improvement as a contractor and avid woodworker. John noticed that there aren’t many expert advice online and he wanted to help the public to get true expert tips and estimates. What started as a hobby soon became a full time job as Handyman tips website became very popular because of the quality of tips it provides. After a few years John has introduces a couple of new content creators into Handyman tips team but he is still the main content creator on Handyman tips website.