
How to make a DIY Pool Deck – Tutorial by Handyman tips
Table of content
A while back we published an article all about above ground pools and after that we received numerous requests to make an article on how to make a DIY pool deck around above ground pool and finally, here it is. Above ground pools are great and cheap but if you want to take pool experience to the next level you need a place for sunbathing and relaxation next to the pool.

Most of people think that building DIY pool deck is to complicated task for them but it really isn’t. It’s a large project in scale but it’s not difficult to make and doesn’t require professional skills. All you need is good lumber, basic woodworking skills, a carpenter tool bag with necessary tools, and some time. The size of the deck is determined by the size of your pool and your personal wishes. Once again, the principal for small and large deck is the same, only differences are in amount of materials and labor.
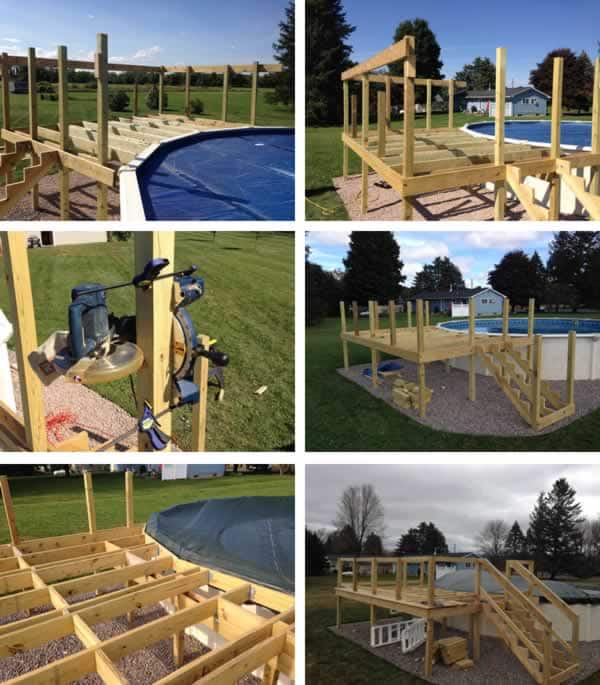
1. Digging up holes and setting up posts

The first thing in any DIY pool deck project is clearing the ground where your future deck will be. Strip all the grass and around 2 inches of dirt where your construction site will be. For the posts we used 4 x 4 lumber and we advise you not to use smaller lumber than that. First take four boards and setup the future look of your deck on the ground. Use that to mark the spots for the posts and remove the boards. Use a post hole digger to dig up holes slightly bigger than the posts. Make sure that your holes are deep enough and that they are below the frost line, at least 3.5 ft. Set the posts in the holes, level them and start to fill the holes with rocks. Once you’re half way there use four larger rocks and secure the post on each side. Then fill up the rest of the hole with rocks. You can also use concrete but this method will be solid also. Don’t forget to protect the part of the post which goes into the ground with waterproof wood sealant because otherwise the posts will rot in the ground.
2. Making the frame of DIY pool deck
After all the posts are in place it’s time to start with the frame. For the beams and joists we used 2 x 6 boards and we advise you to not to used smaller lumber than that. Before you start with the frame, take four pieces of 2 x 4 and use them to temporary secure and level the corner posts. After you screw in the beams you don’t need them anymore and you can remove them. Your beams need to be perfectly leveled and it’s hard to achieve that if both ends of the beam are loose. Use a small piece of wood and temporary screw it to the post below the selected height of the beam and place one end of the beam on it. That way you’re aligning only one end of the beam and you’ll see it’s much easier to level the beam this way. The three outside beams must be the same height and the one near the pool will be 6 inches below. The main frame is now done and you can now secure all the posts and put weed barrier and stone below your future deck. We advise you to do that now because after the deck is finished it’s hard to crawl under it.

3. Making the stairs and securing posts
It’s time to construct the staircase for your deck. For that you’ll need two pieces of 2 x 12 for stringers, 7 pieces of 2 x 6 for risers, 6 pieces of 2 x 8 for runners, one piece of 2 x 6 for the top runner and two pieces of 4 x 4 for the stair posts. Make 6 inch rise and 8 inch run on both stringers and mount them on the beam with stair stringer brackets. Separate the stringers depending on the size you want your stairs to be. Dig up two smaller holes and put 4 x 4 at the end of both stringers and secure them to the stringers.
Before you start with the joists we advise you to temporary secure the upper ends of the posts with 2 x 6 boards. This will reinforce the structure and prevent it from moving while installing joists. After you install the joists you can remove them because the structure is secured with joists now.

4. Installing joists and trimming the posts
Joists are used as a base for the flooring and you need to do that part with extra care if you want to have a nice and leveled deck. For the joists we used 2 x 6 boards and we secured them additionally with corner brackets. You have to measure the length for each joist because the shape of the pool determines the length of the joist. When you measure the distance, take away 2 inches because you will insert boards between the joists and the pool and connect them with joists. You need to put one joist at least every 20 inches if you want a sturdy decking. We installed one joist on each side of every post for additional security and also we installed blocking between the joists to prevent them from twisting. Also we secured the joist on each corner with corner brackets.
You probably noticed that the posts aren’t the same height and that they are probably to high. You need to decide how high your railing will be and mark the height on one post. The use a 2 x 4 and a level to transfer that height on other posts. Trim all the posts on the same height and use the 2 x 4 for the top and bottom rail. If you want, you can add aluminum railing for extra touch.
5. Decking and railings
Your DIY pool deck project is coming to a final stage, it’s time for decking. For decking you can use 5/4 x 6, 5/4 x 8 or 5/4 x 10 boards. We used 5/4 x 6 decking boards because it looks better. First use 1 x 4 boards and secure them around the pool edge, closing the gap with the pool completely. Then start to lay 5/4 x 6 boards from the far end and work your way to the pool. When you come to the 1 x 4 boards it will be a little tricky to cut the perfect shape to match the gap. The trick is to put the board on top of the 1 x 4 board and align it to the last 5/4 x 6 board. Then crawl under the deck and mark the gap with a pen and then cut the board. Decking is really a simple process, just make sure that you secure each board with each joist with wood screws. And always first drill a hole slightly smaller than the screw to avoid cracking and splitting. After you complete the decking finish the stairs by installing the risers and runners.
The final thing left to do is railing. It’s really a decorative final touch and you can complete this part in the way you prefer. We mounted the 1 x 2 spindles every 6 inches and 1 x 4 boards on top of the railing.

DIY other budget-friendly backyard ideas, put some deck chairs and sunshade and enjoy a cold drink by the pool on your new DIY pool deck. Including a glass deck railing will add an aesthetic and elegant look to your exterior house. If you want, you can add aluminum railing for extra touch.
6. Finishing touches for your DIY pool deck
Your new DIY pool deck is now finished and it doesn’t add much to your pool cost. Now you can add some finishing touches like inflatable hot tubs. If your pool isn’t close to your home and you don’t want to mount a hose each time you want to refill your pool then you can construct outside plumbing directly to the pool.
If you have kids you can make an entrance gate. If you don’t know how to make the gate check out our tutorial on how to make DIY small fence gate. You have to protect the deck and the fence with waterproof wood sealant before usage and that’s a must if you want your deck to last.
According to bird control specialists, Robins, sparrows, crows, blackbirds, starlings, and mourning doves are the types of birds you’ll most commonly see around your pool deck. These are wonderful creatures that are an important part of nature’s ecosystem. However, the droppings they leave behind are definitely not pleasant. Many people don’t have time to pressure wash the pool deck when spending time outside. And seeing bird droppings float on by as you’re swimming is the worst experience. Therefore, once done with your DIY Pool deck, you will need to find ways to get rid of these creatures around your home or else enjoying your time outside will not be pleasant. Good news is there are many ways to keep birds from pooping on your deck and pool, these include hanging mirrors, wine fridges, spinning pinwheels, using plastic predator birds and ultrasonic sound systems. You’ll need patio furniture covers in order to protect your new patio furniture. You will have to do proper research on these methods to learn more about how they work.

DIY other budget-friendly backyard ideas, put some deck chairs and sunshade and enjoy a cold drink by the pool on your new DIY pool deck. If you enjoyed building your DIY pool deck you can check out DIY hot tub plans and add an amazing hot tub to your deck.
Maintenance is everything when we’re talking about wooden pool decks. Don’t forget to regularly clean your pool deck and repaint and restain your deck at least every couple years. If you maintain you pool deck regularly it will last you for decades.
About the author – John Barnes
 Handyman tips website was created by John Barnes from Phoenix, Arizona, in February 2014. John wanted to share with the public his 20 year experience in home improvement as a contractor and avid woodworker. John noticed that there aren’t many expert advice online and he wanted to help the public to get true expert tips and estimates. What started as a hobby soon became a full time job as Handyman tips website became very popular because of the quality of tips it provides. After a few years John has introduces a couple of new content creators into Handyman tips team but he is still the main content creator on Handyman tips website.
This was great, but that list of materials would be awesome.
Can I get a material list?
Would love a list of materials needed please.
Hi,
we’ll update the article with material list shortly!
What do you mean by directions?
Regards,
The Handyman tips team!
Can you send me directions and list of materials.
I would like a list & detailed instructions for this deck if possible. I want to build a 10 x 10 (minimum) 14′ x 48″ round pool.
Thank you
I would like a list & detailed instructions for this deck if possible. I want to build a 12 x 16 or a 12 x 18 for 27′ round pool.
Thank you
can i get a list & detailed instructions for this deck. I want to build a 12 x 16 or a 12 x 18 for 27′ round pool.
Thank you
Excellent Work, This is a good and Informative post. In this post I truly got quality information. I am definitely looking more in this post. Really very useful and Informative information are provided here. Thank you so much for writing keep up like this. Thanks
Very good design idea! Your tutorials and tips are very informative and helpful. Thanks again for sharing.
I like the deck you did can you send me material list thank you
Hello. Can I get a materials list for this exact deck please? Thank you! Thank you for the tutorial. I am going to build this myself. Is it possible to use the cement footings where the post sit in it and on the ground providing everything is properly leveled?
can i get a list & detailed instructions for this deck size & maybe a few sizes bigger thanks
I need a supply list for this deck, except it needs to be 12 ft x 24 ft. Thank you in advance.
Hay una lista de materiales en alguna parte? Solo quiero asegurarme de que tengamos todo lo necesario.
How can I get plan and material list
Hello. Can I get a materials list for this exact deck please? Thank you! Thank you for the tutorial. I am going to build this myself.
Very informative article. I personally like to get out and try projects on my own from time-to-time, and articles like this really help calm the nerves and guide through the processes. In the event i get stuck or need help it is always good to have a handyman service on speed dial as well.
Would it be possible to get a materials list please… i have an 18 foot circle and would like to do 2 or 3 sections of that pool. Is it also ok to use the elephant feet with the 4×4 posts instead of digging holes?
Would you recommend pressure treated wood? I read the “good lumber” article and it seems it’s best with dry wood. I am thinking regular lumber for everything but the posts and painting it. Or should I use PT? Or can I use regular lumber, seal the lists where they go into the ground and I ain’t the rest?
Great plans. Looking forward to the project.
I need a list of material needed for a 12 X 10 deck?
i love this, I would like a material list is you are giving them out!! Please and thank you!!!!
How do you get a material list or plan for this? I see many people have commented but I do not see where it was ever answered or posted?
Hi we are Installing our pool this week. The above link is not working for plans and supply list. Can you please post again? Thank you
Great deck. Can you please email me a materials list.
Please, please email me a list of supplies for this. My pool is a 24 round, 52 inch deep. Hubby can build with these wonderful directions.
Can I please get a material list.
I have a 24X48 pool and have been wanting to add to my existing deck. I want more deck space to put lounging chairs. My question is…. When you put a deck around a pool and you have issues with it, will this be another project to take it down to replace?
This article was of great help in understanding how to deck a pool.
Could you possibly send me a materials list of this exact size deck? I live in Mississippi. We are having a pool put in next month and this would be perfect for us.
Hi there!
I have seen a lot of comments requesting a material list and approximate cost for this awesome deck. Can you email those things to me by chance? At least a materials list would be amazing. I live in Arkansas.
Thank you!
Would love to have prints for this for 18×52 pool
where can i get the plans in order to build this deck?
Tulsa, Ok. Would love material list. TIA
Just what we are looking for. Where can we find a material list for this deck for a 18’ x 52” round pool
Can you provide a material list for the 14×9 deck in the picture. I don’t need pricing
How much did this cost you to make?
Is it possible to get a material list?
Beautiful deck and exactly what I’m looking for. Would I be able to get a list of supplies and an approximate cost of supplies? I live in Connecticut.
What were the amounts of materials needed for this project? I see others asked but haven’t been answered. I’m planning on doing this and would love assistance with supplies needed. Thanks!
Hi! Can you tell me about how much you spent for materials if we plan to do this on our own! We live in kodak, TN. Would love a list and most importantly a price estimate.
Can I get a supply list for the pool deck please and thank you..
Are there plans available for this? It’s hard to see exactly what’s going on from the images, many of which are pretty small.
Can I get a list of Materials for this exact project? do not need pricing, just the materials list would be great. Thank you!
Conyers, GA
FYI, we are planning to build this deck ourselves. Material list and cost would be very helpful. Live in Dutchess County, NY. TU
Will this deck for an 18 ft pool. Need material list and price estimate for Beacon, NY if possible. Thanks.
I have seen a ton of comments about a materials list where and how can I get one? Thanks a bunch!
Can you send me a supply list for this one that you built in the article please?
Hi can you please send me the material list
Could you please post a list of materials
Great information. I do agree a materials list would be awesome!
I’m looking for a materials list. We are planning an 8x 12 foot deck.
Hi Lee Ann!
It’s hard to tell the price of a deck, it all depends on the price of building materials in your country/area and the price of a contractor!
If you’re planning to build it yourself then you can tell us where you’re from and we’ll give you the estimate price of building materials!
How much did it cost to build this deck?
We want to get an above ground pool for our girls nexxt year with our income tax and if we have enough left over we would like to build a deck.
Is there a material listing somewhere? I just want to make sure we have everything necessary.
Lovely abd and inspiring
Hi Wade,
you can use as many beams you want, but there is no need for extra beams! When the whole structure is inter-connected there aren’t stability issues what so ever!
For the gap, take the board and cover the gap. Go underneath and mark the gap on the board and the cut, it will fit perfectly ;-)
I have a few questions:
What is the spacing for your posts?
How did you determine only to use 1 beam? It seems at least 2 beams, 1 where you have it and 1 closer to the front of the deck would be more stable???
My deck will be 12 feet from the pool, how many beams would I need?
For the 1×4 boards covering the gap around the pool in step 4 how did you get the shape of the pool support top cap?
Other than these questions this is a Great write up that I will use when building mine this spring.
Thanks for providing it!
Wade
Clover, SC
I wish I had the skills do make things like this. It looks beautiful! And a deck makes above ground pools like 1000x better, since climbing into them with a ladder is such a pain. Much easier just to jump off a deck!
Great post! Have nice day ! :) pagoe
What was the cost for the materials?
The size of the deck in the picture is 14 X 9 ft but you can make it as big as you want ;-)
what is size of this deck in picture?