

Are you looking to add a touch of rustic charm to your outdoor or indoor space? A DIY wood pallet bench might be just what you need! This step-by-step guide will walk you through the process of creating your own unique seating area using reclaimed wood pallets.
With a few simple tools and materials, you can transform a pile of discarded pallets into a beautiful and functional bench. Whether you’re a seasoned DIY enthusiast or a beginner looking to take on a new project, this guide is designed to be accessible and easy to follow.
Not only will this DIY wood pallet bench add character and style to your space, but it’s also an eco-friendly way to repurpose materials that would otherwise end up in a landfill. Plus, there’s something special about sitting on a bench that you’ve crafted with your own hands.
So roll up your sleeves, grab your tools, and get ready to create your own rustic seating oasis with this DIY wood pallet bench guide!
Tools and Materials Needed for DIY Wood Pallet Bench
Before you begin your project, gather the following tools and materials:
Tools:
- Hammer
- Pry bar
- Circular saw or jigsaw
- Drill
- Screwdriver
- Measuring tape
- Sandpaper or sander
Materials:
- Wood pallets (quantity will depend on the desired size of your bench)
- 2×4 lumber (for the frame)
- Screws
- Wood glue (optional)
- Paint or stain (optional)
- Cushions or pillows (optional)
Once you have all the necessary tools and materials, it’s time to prepare the pallets for the bench.

1. Preparing the Pallets for the Bench
Start by inspecting the pallets for any damage or loose boards. Use a hammer and pry bar to remove any nails or staples that may be sticking out. This will ensure that the pallets are safe to use and will provide a sturdy foundation for your bench.
Next, decide how many pallets you want to use for the seating area. This will depend on the length of the bench you desire.
Use the hand saw or the jig saw to cut the palette in two pieces in 1/3 and 2/3 ratio as shown on the picture below. Pay attention to cut on 1/3 of the palette because you will use the smaller part for the back and the bigger part for the seat. Cut four pieces of 2×4 for the legs of the bench. The length of the legs determines the height of the future bench, we recommend 24 inches.

2. Attaching the legs
Turn the bigger part of the pallet upside down and use the metal corner brace to assemble the legs on the corners as shown on the picture below. Also it is better to use the plate corner brace to reinforce the legs on the other side. It is very important to use only the wood screws designed specially for wood, using screws not intended for wood will lead to unstable final product!


3. Attaching the back
Turn the bench on side and use the plate corner braces to attach the back of the bench. Then put the bench back into position and reinforce it on the front side with the metal corner brace and the bench is finished.


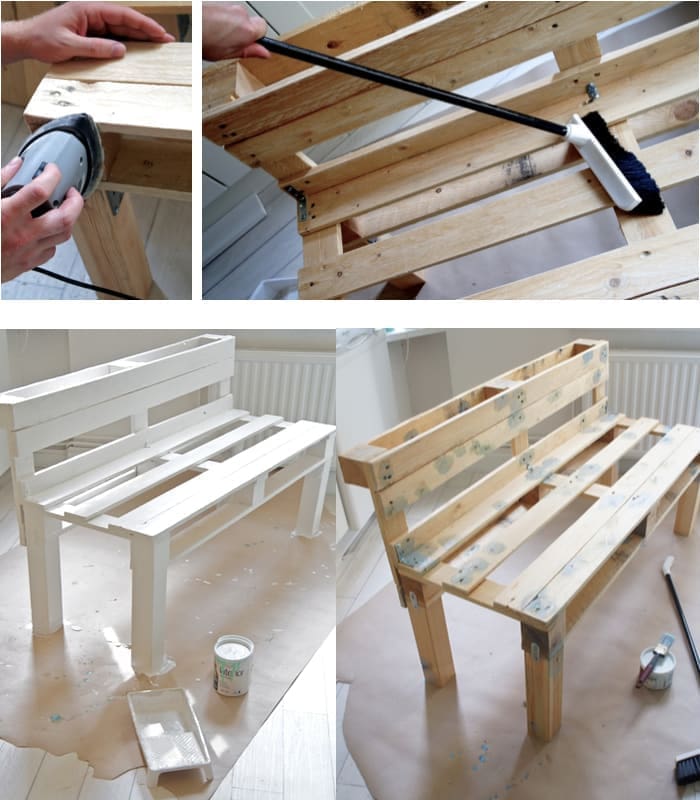
4. Preparing and painting
Inspect the surfaces of your new bench and fill the gaps and holes with the wood filler using the putty knife. Then let the surface to dry for about two hours and then sand the whole surface with the sander and wipe the surface. Then paint the surface with the paint brush and two coates of latex paint. The final product is astonishing and the best of all it is almost free!

Adding Cushions and Accessories
To make your wood pallet bench even more inviting, consider adding cushions or pillows. Measure the seating area of the bench and choose cushions or pillows that fit the dimensions. Opt for weather-resistant materials if you plan to use the bench outdoors.
You can also personalize your bench by adding accessories such as a side table, planters, or even a built-in storage area. Get creative and customize your bench to suit your needs and style.
Maintenance and Care Tips for Your DIY Wood Pallet Bench
To ensure the longevity of your DIY wood pallet bench, there are a few maintenance and care tips to keep in mind:
- Regularly inspect the bench for any signs of damage or wear. Replace any loose or damaged boards as needed.
- Clean the bench regularly by wiping it down with a damp cloth or using a mild soap and water solution.
- If the bench is exposed to the elements, consider applying a weather-resistant sealant or protective coating to prolong its lifespan.
- Avoid placing heavy objects or excessive weight on the bench to prevent warping or damage.
- If the cushions or pillows become dirty, follow the manufacturer’s instructions for cleaning or consider using removable, washable covers.
By following these maintenance and care tips, your DIY wood pallet bench will continue to be a beautiful and functional addition to your space for years to come.
Conclusion
Creating your own DIY wood pallet bench is a rewarding and eco-friendly project that allows you to add a touch of rustic charm to your space. With just a few tools and materials, you can transform reclaimed wood pallets into a beautiful and functional seating area.
Remember to gather all the necessary tools and materials before starting, and follow the step-by-step guide to prepare the pallets, build the frame, attach the pallets, and finish the bench. Don’t forget to add cushions or pillows for added comfort and style.
With proper maintenance and care, your DIY wood pallet bench will become a beloved piece of furniture that brings character and warmth to your space. So roll up your sleeves, grab your tools, and get ready to create your own rustic seating oasis with this DIY wood pallet bench guide!




I really like this. I have a few mates who have made some dining room tables from pallets. It’s amazing what you can do with things you can get for free.