
The Ultimate Guide to Successfully Lay Ceramic Tiles: Step-by-Step Tips and Tricks Revealed
Table of content
Are you ready to embark on a DIY project to lay ceramic tiles but unsure where to start? Look no further, as we present to you the ultimate guide to successfully lay ceramic tiles. In this step-by-step guide, we will reveal tips and tricks that will help you achieve professional-looking results.
Whether you’re planning to tile your bathroom, kitchen, or any other area, this guide has got you covered. From choosing the right tiles and preparing the surface to laying and grouting, we will walk you through each stage of the process.
Our brand voice emphasizes simplicity and expertise, and we understand that laying ceramic tiles can be daunting for beginners. But fear not! With our clear and concise instructions, even novice DIYers can achieve stunning and long-lasting results.

Discover the tools you’ll need, learn how to handle tricky areas, and gain insight into common mistakes to avoid. With our comprehensive guide, you’ll have the knowledge and confidence to transform any space with beautiful ceramic tiles. Get ready to roll up your sleeves, because it’s time to get tiling!
Tools and Materials Needed for the Tile Installation
Before you dive into laying ceramic tiles, it’s essential to gather the necessary tools and materials. Here’s a comprehensive list of what you’ll need:
- Ceramic tiles: Choose tiles that suit your style and the area you’re tiling. Consider factors such as size, color, and durability.
- Tile adhesive: Opt for a high-quality adhesive suitable for ceramic tiles. It should have strong bonding properties and be suitable for the surface you’re tiling.
- Trowel: Select a notched trowel that matches the size of the tiles you’re using. This tool is essential for applying the adhesive evenly.
- Tile spacers: These small plastic pieces ensure consistent spacing between tiles, creating a professional finish.
- Tile cutter: A tile cutter allows you to make precise cuts for tiles that need to fit around fixtures or edges. Choose a manual or electric cutter based on your preference and project requirements.
- Level: A level helps ensure that your tiles are laid flat and even. It’s crucial for achieving a professional-looking result.
- Grout: Select a grout color that complements your tiles. Consider factors such as moisture resistance and ease of application.
- Grout float: This tool is used to apply grout evenly and push it into the gaps between tiles.
- Sponge: A damp sponge is handy for wiping away excess grout and cleaning the tiles.
- Bucket and mixing paddle: You’ll need these to mix the adhesive and grout according to the manufacturer’s instructions.
- Measuring tape: Accurate measurements are essential for planning the tile layout and making precise cuts.
- Safety gear: Don’t forget to protect yourself with safety goggles and work gloves when handling tools and materials.
Now that you have all the necessary tools and materials, let’s move on to preparing the surface for tile installation.
Preparing the Surface for Tile Installation
Proper surface preparation is crucial for a successful ceramic tile installation. Follow these steps to ensure a clean and stable surface:
- Clean the surface: Remove any dirt, dust, or debris from the area you’ll be tiling. Use a broom or vacuum cleaner to get rid of loose particles.
- Repair any damage: Inspect the surface for cracks, holes, or uneven areas. Fill in any gaps or cracks with a suitable patching compound and level the surface with a trowel. Allow the compound to dry completely before proceeding.
- Remove old tiles or adhesive: If you’re replacing old tiles, carefully remove them using a chisel or scraper. Be cautious not to damage the underlying surface. If there’s any leftover adhesive, use a tile adhesive remover or a heat gun to soften it and scrape it away.
- Smooth the surface: Use a sanding block or sandpaper to smooth any rough areas or high spots on the surface. This step ensures that the adhesive bonds securely to the surface.
- Clean and dry the surface: Before applying the adhesive, wipe the surface with a damp cloth to remove any remaining dust or debris. Allow the surface to dry completely.
By following these steps, you’ll create a clean and stable surface ready for tile installation. Now it’s time to measure and mark the tile layout.

Measuring and Marking the Tile Layout
Accurate measurements and careful planning are essential for achieving a professional-looking tile layout. Follow these steps to measure and mark your tile layout:
- Start with a centerline: Find the center of the area you’re tiling and mark it with a vertical and horizontal line using a pencil and a level. This centerline will serve as a reference point for your tile layout.
- Determine tile placement: Lay out a row of tiles along the centerline without adhesive to visualize how they’ll fit. Make sure to use tile spacers to maintain consistent spacing between the tiles.
- Adjust the centerline if needed: If the tiles at the edges are too small or require excessive cutting, adjust the centerline slightly to ensure a more balanced layout. This step is crucial for achieving aesthetically pleasing results.
- Measure and mark the tile cuts: Use a measuring tape to determine the size of the tiles that need to be cut to fit around fixtures or edges. Mark these measurements on the tiles with a pencil or tile marker.
- Double-check your layout: Before applying adhesive, double-check your layout by dry-fitting the tiles again. This step helps ensure that everything fits as planned and allows you to make any necessary adjustments before permanently adhering the tiles.
By taking the time to measure and mark your tile layout accurately, you’ll save yourself from potential headaches and ensure a visually pleasing end result. Now let’s move on to mixing and applying the tile adhesive.
Mixing and Applying the Tile Adhesive
Properly mixing and applying the tile adhesive is crucial for a strong and durable bond. Follow these steps to ensure successful application:
- Read the instructions: Carefully read and follow the manufacturer’s instructions on the adhesive packaging. Different adhesives may have specific mixing ratios and application techniques.
- Prepare the adhesive: In a clean bucket, mix the adhesive according to the manufacturer’s instructions. Use a mixing paddle attached to a power drill for efficient and thorough mixing. Avoid mixing more adhesive than you can use within the recommended working time.
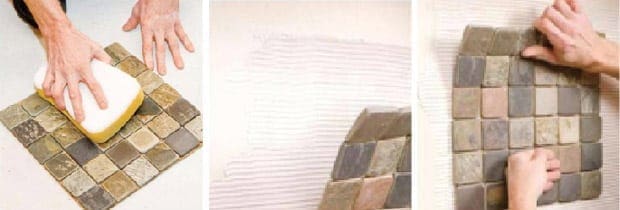
- Apply the adhesive: Starting at the centerline, use the notched side of the trowel to spread a layer of adhesive onto the surface. Hold the trowel at a 45-degree angle to create ridges in the adhesive. This pattern helps ensure proper bonding between the tiles and the surface.
- Work in small sections: Only spread enough adhesive that you can comfortably cover with tiles within the working time of the adhesive. This approach prevents the adhesive from drying out before you can lay the tiles.
- Lay the tiles: Place the tiles firmly into the adhesive, aligning them with the marked layout. Press down gently and wiggle each tile slightly to ensure a good bond. Insert tile spacers between the tiles to maintain consistent spacing.
- Check for level and adjust: Use a level to ensure that each tile is flat and even. If needed, adjust the tile by adding or removing adhesive before it sets.
- Clean excess adhesive: Use a damp sponge or cloth to wipe away any excess adhesive from the tile surface immediately. Leaving adhesive to dry on the tiles can be difficult to remove later.
By following these steps, you’ll achieve a strong bond between the tiles and the surface, setting the foundation for a successful ceramic tile installation. Now let’s move on to cutting tiles to fit around fixtures and edges.
Cutting Tiles to Fit Around Fixtures and Edges
Inevitably, you’ll encounter areas where tiles need to be cut to fit around fixtures, edges, or irregular shapes. Here’s how to tackle these tricky areas:
- Measure twice, cut once: Measure the area where the tile needs to fit precisely. Use a tile marker or pencil to mark the measurements directly onto the tile’s surface.
- Use a tile cutter: For straight cuts, score the tile’s surface along the marked line using a tile cutter. Apply pressure evenly and then snap the tile along the scored line. Smooth any rough edges with a tile file or sandpaper.
- Employ a wet saw for curved cuts: If you need to make curved or intricate cuts, a wet saw is the best tool for the job. Follow the manufacturer’s instructions for operating the wet saw safely.
- Test the fit: Before applying adhesive, test the cut tile’s fit by placing it in the desired location. Make any necessary adjustments to ensure a precise fit.
- Apply adhesive and lay the cut tile: Once you’re satisfied with the fit, apply adhesive to the back of the cut tile and firmly press it into place. Use tile spacers to maintain consistent spacing.
Cutting tiles to fit around fixtures and edges requires patience and precision. Take your time and double-check your measurements to achieve seamless integration of the tiles into your space. Now let’s move on to grouting the tiles.

Grouting the Tiles
Grouting is the final step in completing your ceramic tile installation. Follow these steps for a clean and professional grouting process:
- Read the instructions: Familiarize yourself with the grout manufacturer’s instructions. Different grouts may have specific mixing ratios and curing times.
- Prepare the grout: In a clean bucket, mix the grout according to the manufacturer’s instructions. Use a mixing paddle attached to a power drill for efficient and thorough mixing. Ensure that the grout reaches a smooth and lump-free consistency.
- Apply the grout: Using a grout float, spread the grout diagonally across the tiles, pressing it firmly into the gaps. Work in small sections, making sure the grout completely fills each gap.
- Remove excess grout: After applying the grout, wait for a few minutes until it starts to set. Then, using a damp sponge or cloth, wipe away the excess grout from the tile surface at a 45-degree angle. Rinse the sponge frequently and wring it out well to avoid smearing excess grout.
- Clean and cure: Once you’ve removed most of the excess grout, use a clean, damp sponge to wipe the tiles again. This step ensures a polished and finished look. Allow the grout to cure according to the manufacturer’s instructions before exposing it to water or heavy traffic.
By following these steps, you’ll achieve clean and professional-looking grout lines, enhancing the overall appearance of your ceramic tile installation. Now, let’s move on to sealing and cleaning the tiled surface.

Sealing and Cleaning the Tiled Surface
Sealing your ceramic tiles is an optional but recommended step that helps protect the tiles and grout from stains and moisture. Here’s how to seal and clean the tiled surface:
- Read the instructions: If you choose to seal your tiles, carefully read and follow the sealer manufacturer’s instructions. Different sealers may have specific application techniques and curing times.
- Prepare the surface: Ensure that the tiled surface is clean and dry before applying the sealer. Remove any dust or debris using a soft brush or vacuum cleaner.
- Apply the sealer: Using a clean cloth or brush, apply the sealer evenly across the tiles and grout. Follow the manufacturer’s instructions regarding the recommended number of coats and drying times. Allow the sealer to cure completely before exposing the tiles to water or heavy traffic.
- Regular cleaning: To maintain the beauty of your ceramic tile installation, clean the surface regularly with a mild detergent or tile cleaner. Avoid using harsh chemicals or abrasive cleaners that can damage the tiles or grout.
By sealing your tiles and maintaining regular cleaning, you’ll prolong the lifespan and appearance of your ceramic tile installation. Now, let’s move on to some final tips and tricks for a successful ceramic tile installation.

Final Tips and Tricks for a Successful Ceramic Tile Installation
Here are some additional tips and tricks to keep in mind as you embark on your ceramic tile installation journey:
- Take your time: Rushing through the installation process can lead to mistakes. Give yourself ample time and don’t hesitate to seek assistance or take breaks when needed.
- Plan ahead: Before you begin, visualize the end result and plan your tile layout accordingly. Consider factors such as tile size, pattern, and color coordination.
- Practice makes perfect: If you’re new to tiling, consider practicing on a small, inconspicuous area before tackling larger spaces. This practice run will help build your confidence and refine your technique.
- Be mindful of tile thickness: If you’re tiling an area that connects to another surface, such as a carpeted floor, make sure to choose tiles with a thickness that matches the adjacent surface. This step ensures a smooth transition without tripping hazards.
- Protect your tiles during construction: If you’re installing tiles in a construction zone, cover them with protective materials to prevent damage from debris, tools, or foot traffic.
- Keep spare tiles: It’s always a good idea to purchase a few extra tiles to have on hand in case of future repairs or replacements. This way, you can ensure a perfect match even years down the line.
Remember, practice, patience, and attention to detail are key to achieving a successful ceramic tile installation. Don’t be afraid to ask for help or consult professional advice if needed. With the knowledge gained from this guide, you’ll be well-equipped to transform any space with beautiful ceramic tiles.
Conclusion
Congratulations! You’ve reached the end of the ultimate guide to successfully lay ceramic tiles. We hope this comprehensive step-by-step guide has provided you with the confidence and knowledge to tackle your own ceramic tile installation project.
From gathering the necessary tools and materials to preparing the surface, measuring and marking the tile layout, applying adhesive, cutting tiles, grouting, and sealing—the process may seem overwhelming at first, but with careful planning and execution, you’ll achieve professional-looking results.
Remember to take your time, follow the manufacturer’s instructions, and maintain a clean and organized workspace. Don’t be afraid to make adjustments along the way and seek assistance when needed.
With our guide by your side, you’re now ready to transform any space with beautiful and durable ceramic tiles. So roll up your sleeves, gather your tools, and let the tiling adventure begin!
About the author – John Barnes
 Handyman tips website was created by John Barnes from Phoenix, Arizona, in February 2014. John wanted to share with the public his 20 year experience in home improvement as a contractor and avid woodworker. John noticed that there aren’t many expert advice online and he wanted to help the public to get true expert tips and estimates. What started as a hobby soon became a full time job as Handyman tips website became very popular because of the quality of tips it provides. After a few years John has introduces a couple of new content creators into Handyman tips team but he is still the main content creator on Handyman tips website.